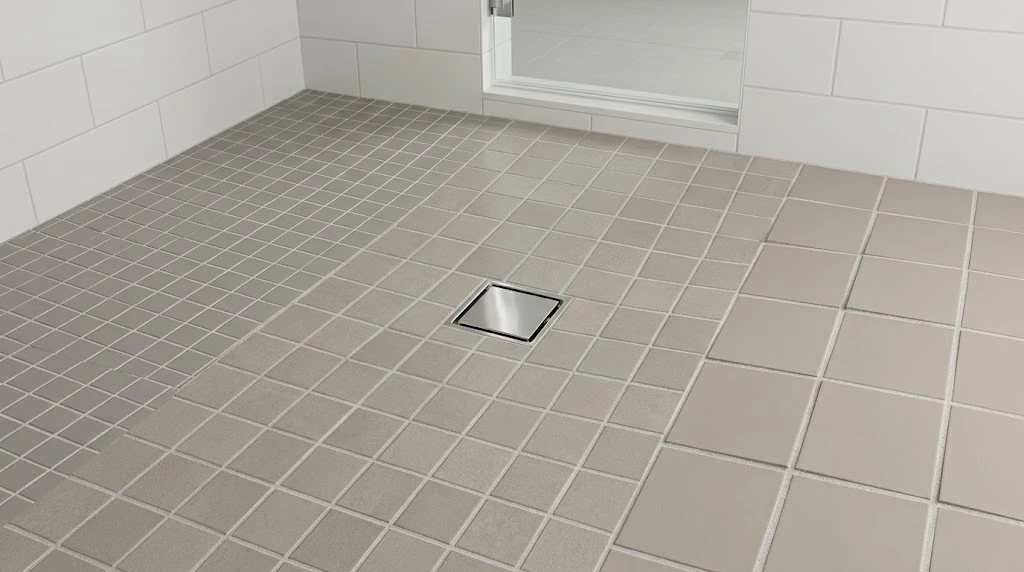
Every shower build comes down to one component. That component is the pan. Water must travel from the walls to the drain without stopping. Small tiles make that possible, but only the correct size.
Too large, and the tile rocks on the slope. Too small, and you sign up for endless scrubbing. The sections below walk through the trade-offs. Read them before you commit to a purchase.
Why Small Tiles Handle Slopes
Water leaves a shower through a floor that leans. Builders aim for a quarter inch of fall per foot of run. That pitch is enough to keep water moving. It is also enough to lift the corners of big tiles.
Picture a 12x12 unit across a sloped bed. Because the tile is rigid, it spans the change in height. One side lifts, leaving a lip you can feel. Water then stops short of the drain and sits there.
Mosaics behave differently. Each piece covers only a small patch of the bed. That lets the sheet hug the mortar as it curves. The joints between pieces absorb the difference that a large tile cannot.
Fewer joints would defeat the purpose. This is why wall-rated sheets make poor pan material. Open gaps let the sheet flex and settle. Consistent spacing across the floor keeps everything working as one surface.
The Three Common Size Groups
Shower floors tend to use one of three formats. Those are 1x1 inch, 2x2 inch, and 3x3 inch or larger. Weighing mosaic tiles bathroom projects usually means choosing among these. Below is what each one brings to the job.
1x1 Inch or Smaller
The smallest units bend to almost any contour. Steep curbless designs benefit most from them. A linear drain set against a sharp drop needs this kind of flexibility. Rounded corners also suit them well.
There is a maintenance cost. Every extra tile adds a joint. Every joint collects soap residue and mineral scale. If you dislike routine scrubbing, this size will test your patience.
2x2 Inch
Ask most installers which size they reach for. The answer is usually a 2x2 sheet. It follows a standard slope without lifting at the edges. It also leaves fewer joints than the smallest option.
Cleaning stays manageable with this format. Coverage moves quickly too, since each sheet holds a fair number of tiles. If you walk into a tile shop and describe a typical pan, expect to be shown this size first. It fits the widest range of residential conditions.
3x3 Inch and Larger
Grout maintenance drives some owners toward bigger pieces. They select 3x3 or 4x4 mosaics to cut joint count. The idea is reasonable, but the margin for error shrinks. A 4x4 unit on a standard slope may rise at one corner.
Very gentle falls make this workable. If the pan barely tilts toward the drain, larger pieces can sit flat. Otherwise, three inches is a sensible limit. Beyond it, the odds of lippage climb quickly.
Traction and Grout Choices
A shower floor meets bare feet in the wettest room of the house. Grip matters. Joints between tiles give that grip, since the tile face is usually smooth. Smaller formats simply place more joints underfoot.
A sheet of 1x1 units reads as mostly grout. That makes it one of the least slippery surfaces available. A 2x2 sheet performs well enough for most households. Larger pieces reduce friction and raise the chance of a slip.
Grout selection follows the same logic. Sanded grout suits joints wider than an eighth inch. Typical mosaic gaps run 1/16 or 1/8 inch, so unsanded grout usually applies. Soft stones such as travertine can scratch if sand is used.
Test any grout in a corner first if you are unsure. Check the manufacturer’s written guidance as well. Colour selection is easier once the joint width is fixed. Narrow joints also keep water from sitting in the floor.
Picking a Material That Survives Water
Pan material must tolerate constant moisture. Some options do this with almost no upkeep. Others need regular attention to stay intact. Consider the maintenance commitment before falling for a look.
Porcelain absorbs very little water and shrugs off stains. It comes in a wide range of colours, textures, and finishes. Matte surfaces add grip without extra joints. On performance alone, it leads the field for pan use.
Stone brings warmth and variation that few products match. Travertine and slate are familiar picks for wet areas. Both are porous and require sealing before grouting and again after. Yearly resealing keeps water from soaking in and turning the surface dark.
Glass earns praise for depth of colour and light. It is fully waterproof, which helps. However, the surface stays slick when wet, so format becomes critical. Use only tiny glass pieces such as 1x1 units or penny rounds, where joints do the gripping.
Understanding Sheet Construction
Mosaics arrive as sheets, and the backing type shapes performance. Mesh backing dominates the market. Fiberglass mesh holds the tiles while allowing the sheet to bend. That flexibility suits sloped mortar beds and custom drains.
Paper facing works the other way around. Sheets are installed face-down, then the paper is soaked off. Nothing sits between tile and mortar, which helps the bond. The drawback is visibility; you cannot see the tiles until the paper comes away.
Gaps between tiles are essential. Sheets with fused edges are built for walls, not pans. Without joints, the sheet cannot curve to match the fall. Every tile needs clear spacing on all sides.
Setting Out the Floor
Layout begins at the drain, since that is the lowest point. Find its centre and place the first sheet directly over it. Move outward toward the walls from there. This approach keeps the perimeter cuts balanced.
No pan is perfectly square, so expect to trim. Standard round drains measure four inches across. Remove the four tiles covering the flange and leave a small clearance. The drain cover hides those edges later.
Corners deserve slow, careful measurement. Cut sheets so joints stay even everywhere. If your sheet uses 1/8 inch spacing, keep that spacing at the walls. Mixed widths look untidy and catch debris.
Dry-fitting the whole floor before mixing adhesive saves headaches. Mark cuts and check the drain opening while everything is loose. If the layout feels awkward, a quick conversation at a tile shop can clarify sheet offsets. Small checks early prevent costly corrections.
Where and How to Buy
Big box stores carry plenty of mosaic products. Their range is decent, but the guidance can be general. A dedicated tile shop tends to stock floor-rated sheets and staff who read slope diagrams. That knowledge matters when a product must perform in a wet zone.
Take the drain assembly along when you shop. Holding the flange against a sheet shows how tiles will sit around the opening. You also learn whether the pieces are large enough to cut cleanly. It is a small habit with real payoff.
State your project plainly when you ask for help. Describe the pan, the slope, and the drain size. Staff respond better to specifics than to vague requests. Ask directly whether a sheet is rated for floors rather than walls.
Build a cushion into your order. Fifteen percent extra covers broken tiles and cutting errors. Dye lots shift between runs, so a later purchase may not match. Having spare boxes on hand avoids a return trip.
Solving Problems After Installation
Issues can appear even when the plan was sound. Three checks cover most of them. Run them before the grout hardens and fixes everything in place.
Start with water. Pour a bucket across the floor and watch the flow. Water should reach the drain and stop there. Standing puddles mean the mortar needs adjustment beneath that area.
Then check the surface by touch. Slide your hand across the tiles and feel for raised edges. A single high 2x2 piece can be tapped down with a rubber mallet. Widespread height differences point to a format that was simply too large.
Finish at the drain. Cut edges there meet moving water all day. Rough cuts snag debris and slow drainage. A rubbing stone tidies them in minutes.
Final Thoughts
Slope drives every size decision on a shower pan. Tiles must bend to the fall of the bed. Match the format to the pitch, and the floor stays even. Most residential showers land on a 2x2 porcelain mosaic.
Steep designs call for 1x1 units instead. Owners who dislike grout may push toward 3x3, provided the fall is gentle. Measure the drain and buy extra material either way. A well-built pan keeps draining properly for decades.
Comments
No comments yet. Be the first to react!